


How to Cut a Newborn's Nails Safely at Home?

Every time you search how to cut a newborn's nails, it looks simple on screen, but those tiny fingers in real life feel scary to go near with anything sharp.
That feeling is completely normal. Almost every new parent hesitates the first few times. Newborn nails look soft and fragile, yet they still manage to leave red lines on cheeks, on a breastfeeding parent’s skin, and even on their own little eyelids. Ignoring them is not an option, but rushing into trimming can feel just as stressful.
The good news is that nail care does not have to be a battle. With the right timing, the right baby-safe tools, and a calm step-by-step way of working, trimming newborn nails quickly becomes just another gentle part of your routine. In this guide, you will learn:
- Why nail care matters
- When to start and how often to trim
- Exactly how to cut a newborn's nails safely
- Which tools work best
- Expert tricks to avoid tears
- What to do if you ever nick the skin
By the end, you will feel ready to handle those tiny nails with steady hands and a relaxed mind.
As many pediatric nurses like to say, “If you feel a bit nervous trimming those tiny nails, it means you are paying attention-and that’s a good thing.”
Why Cutting Your Newborn's Nails Is Essential?

Newborn nails are very different from yours - as guidance on Nail Care for Newborns explains, they are thin, soft, and often slightly see-through in the first weeks. At the same time, the edges can be surprisingly sharp, especially when your baby waves their hands around without any control. That mix of softness and sharp edges is what makes trimming newborn fingernails so important.
Fingernails grow fast during the early months, so they quickly reach a length where they start scratching delicate skin. Babies keep their hands close to their faces, and the startle reflex makes them fling their arms suddenly. This is why parents often notice tiny cuts on cheeks, nose, and even near the eyes. Those scratches may be small, but they still hurt and can easily collect germs.
Long nails also trap:
- Dirt
- Lint from clothes
- Bacteria under the tips
Since babies love to suck on their fingers, this build-up can enter the mouth and raise the chance of infections. For breastfeeding mothers, sharp nails often mean painful scratches on the breast or areola during feeds, which can make feeding time stressful instead of soothing.
Toenails bring another set of issues. If you rarely trim them, they may curl and press into the surrounding skin, which can lead to painful ingrown toenails. This is less common in tiny babies, but good habits from the start keep the risk low as your child grows.
Some parents depend on baby mittens to stop scratching. Mittens are fine for short periods, especially right after birth, but long-term use is not ideal because babies learn by touching and feeling. Covering their hands all day can slow that learning. Regularly trimming newborn nails is a simple, kind habit that keeps your baby safe and comfortable without blocking their natural need to explore.
Many pediatricians remind parents, “Short, smooth nails are one of the simplest ways to protect a baby’s skin.”
When To Start And How Often To Trim?
One of the first questions in your mind is usually about timing. Many doctors suggest waiting around two to four weeks before the first proper trim - a recommendation supported by Caring for a Baby's nails guidance from Columbia University's medical team - because in the very early days the nails may still be attached tightly to the nail bed. It can be tricky to see where nail ends and skin begins. Giving it a little time lets the nail grow past the fingertip, so you can see a clear edge.
That said, every baby is different. If you see obvious long, scratchy tips earlier, you can gently file them with a soft baby file instead of cutting. Think of that first month as a period to observe closely and start slow. The main rule is simple: when the nail is long enough to scratch the skin, it is time to shorten it in a safe way.
There are also some older tips that are better left in the past. Some people still suggest biting or peeling a baby’s nails. Both are unsafe:
- Biting transfers germs from your mouth straight to your baby’s skin and nail folds, which can lead to painful infections.
- Peeling can tear the nail too far down, pulling the delicate skin underneath and causing bleeding.
To keep things easy, use this simple guide for how often to trim:
|
Nail Type |
Usual Frequency |
|
Fingernails |
Once or twice per week |
|
Toenails |
Once or twice per month |
You can add nail checks to moments that already exist in your day:
- During bath time
- While applying baby lotion
- After a diaper change
These quick looks help you notice when cutting newborn nails is due again. If you miss a trim one week, do not worry. Just catch up when you notice the nails getting long or scratchy again.
Choosing The Right Tools: R For Rabbit Baby Manicure Kits And More
The tools you use matter a lot when you are working near tiny fingers. Using adult clippers or scissors feels tempting, but they are too big, too sharp, and not shaped for a baby’s small nails. Choosing tools made especially for infants makes nail cutting for newborns safer and far less stressful for you.
Types Of Nail Trimming Tools

Parents often try more than one method before finding what feels most comfortable. Here is a quick comparison of the most common options for how to cut an infant's nails:
|
Tool |
Best For |
Pros |
Cons |
|
Baby nail clippers |
Quick, regular trims |
Fast, clean cut, some add a viewing window |
Need a steady hand, chance of nicks if rushed |
|
Baby nail scissors |
Parents who like precision |
Good visibility and control over each snip |
Can feel scary at first, need practice |
|
Emery boards / soft files |
Very young newborns, anxious parents |
No risk of cuts, great for smoothing edges |
Slower, less effective on thicker nails |
|
Electric nail trimmers |
Tech-loving parents, wiggly babies |
Very gentle, smooth finish, usually quiet |
Cost more, need batteries or charging |
Many parents end up mixing methods. You might use scissors or clippers to shorten the nail and then finish with a file to smooth any little rough corners. Whatever you choose, keep one golden rule in mind: never use adult tools on baby nails.
A common piece of advice from parenting educators is, “If the tool looks big next to your baby’s finger, it is too big for the job.”
Why R For Rabbit Baby Manicure Kits Stand Out
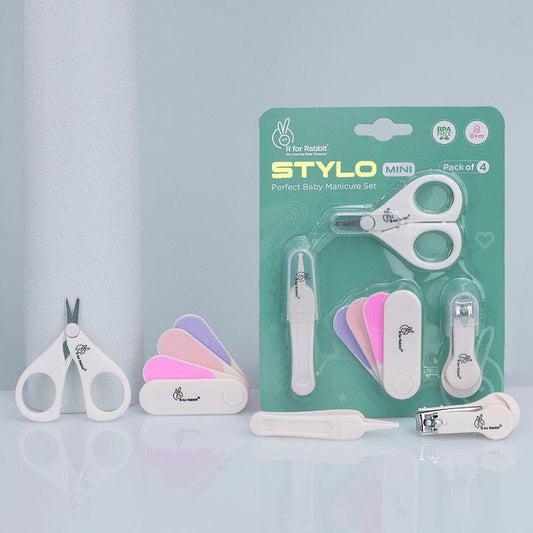
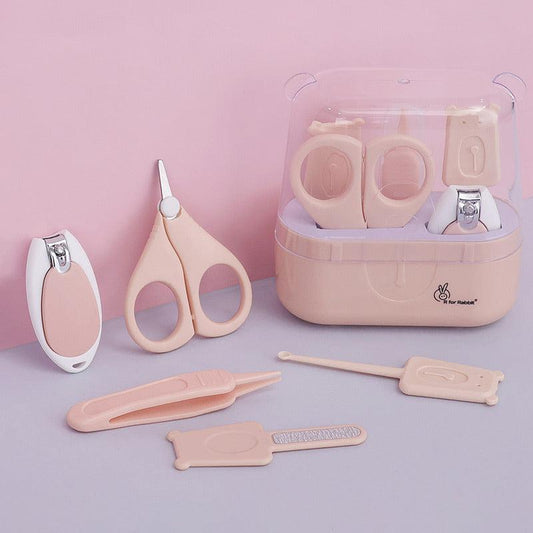
Instead of buying each item separately, many Indian parents prefer a complete baby manicure kit. R for Rabbit designs grooming sets especially for tiny hands and nervous first-time parents, keeping safety and comfort at the center.
- Stylo Apple Baby Manicure Set comes in soothing Green and Blue options and includes a baby nail cutter, nail filer, tweezers, and scissors sized just right for newborn nails.
- Stylo Teddy Baby Manicure Set brings the same handy tools in a cute Pink design.
- For parents who love compact gear, the Stylo Tweety New Born Grooming Kit offers a neat styling set with the same nail care essentials in a smaller case.
For those who want an all-round option, the Stylo All-in-One Baby Grooming Kit is a popular pick. It includes a baby nail cutter with a built-in magnifying glass, which helps you see every tiny edge clearly while you work. Many mothers describe this clipper as a real help when they are still learning how to cut a newborn's nails without touching the skin.
Across all these kits, R for Rabbit uses BPA-free, good quality materials that feel gentle on sensitive skin while still doing the job well. The tools have soft edges and smooth finishes so there are no harsh corners near your baby’s fingers. Each kit comes in a travel-friendly case, so your nail care tools stay clean, easy to find, and ready to slip into a diaper bag. These grooming ranges are widely used by Indian parents who want safe, baby-focused nail care tools they can rely on.
How To Cut A Newborn's Nails: A Step-By-Step Guide
Once you have the right tools, the next step is learning the actual technique. Knowing the clear steps for how to cut newborn fingernails makes the process calmer for both you and your baby. Remember that you do not need to finish all ten fingers in one sitting; a few nails at a time still count as progress.
Step-By-Step: Trimming Fingernails
Follow this simple process:
- Choose the right moment
The easiest time is when your baby is in deep sleep, which usually begins about twenty to thirty minutes after drifting off. Hands tend to relax and open naturally, so you can see each finger clearly. Trimming right after a warm bath is also helpful because the nails become softer, and your baby is usually more relaxed. Whatever moment you choose, make sure the light is bright so you see every detail.
- Settle into a secure position
Many parents like to sit with the baby’s back against their chest so they can hold the hands gently from behind. Others prefer placing the baby on a flat, safe surface such as a bed or changing mat. The goal is that your own arms feel supported and your baby cannot roll or jerk suddenly out of your grip.
- Work on one hand at a time
Hold your baby’s hand gently but firmly, speaking softly or humming to keep them calm. Take one finger and use your thumb to press the soft fingertip pad slightly away from the nail. This small move creates a safe space between nail and skin, and it is the most important part of how to cut a newborn's nails without hurting them.
- Trim along the natural curve
Whether you use baby clippers or scissors, take tiny bits off instead of trying to cut the full width in one go - a technique reinforced by Nailing It: How to trim your baby's fingernails, published by the American Academy of Pediatrics. Stay above the pink part of the nail; leaving a thin white edge is safer than cutting too close. If your baby wakes or starts wriggling, pause, comfort them, and continue only when they settle again.
- Smooth the edges
After the main trimming, gently smooth the edges with a soft emery board or baby file. This step removes any sharp bits left from cutting and helps prevent accidental scratching.
- Take breaks when needed
Once you finish a hand, give your baby a cuddle, even if a few nails still remain on the other hand. You can always come back later. Over time, this calm pattern shows your little one that nail trimming is nothing to worry about.
One parenting coach puts it simply: “Small cuts, slow moves, and lots of cuddles-that’s the recipe for stress-free baby nail care.”
Toenail Trimming: Key Differences

Toenails often feel less scary because they are not near your baby’s face, but they need a slightly different method. They grow more slowly than fingernails, so you may only need to check them every week and trim them every two to four weeks. They also tend to be softer, which makes them easier to cut once you know the right shape.
The main rule with baby toenails is to cut straight across, not in a curve like fingernails. When you round off the corners or cut too short, the nail edge can start digging into the side skin as it grows, leading to ingrown toenails. These can become red, swollen, and painful, which is hard for such a small baby to handle.
For safer toenail trims:
- Sit where you can see the toes clearly, with good light.
- Hold the foot gently and press the pad of each toe slightly away from the nail.
- Trim in a straight line across the top, leaving a small bit of white nail.
- If the corners feel sharp after cutting, lightly file just the very tips to soften them, without rounding deeply into the sides.
As with fingers, it is fine to do one foot today and the other tomorrow. Slow and steady always beats rushed trimming.
R for Rabbit’s Best Selling Baby Manicure Set:
- ₹ 275
- ₹ 333
- 17% off
 Trending


- ₹ 340
- ₹ 415
- 18% off
 Bestseller

- ₹ 279
- ₹ 333
- 16% off

- ₹ 340
- ₹ 415
- 18% off

- ₹ 396
- ₹ 495
- 20% off
Expert Tips For A Tear-Free Nail Trimming Experience
Even when you know how to trim newborn nails, real life can bring wiggly legs, sudden cries, or that one finger that never seems to stay still. A few small tricks from experienced parents can make each session feel smoother and more confident.
Tips For Calm And Confident Trimming

To keep trimming as peaceful as possible:
- Use your support system
In many Indian homes, grandparents, partners, or other family members are happy to help. One person can hold the baby, talk or sing, and keep them distracted while the other handles the trimming. This two-person method is especially helpful during the first few attempts when your own hands may shake a little.
- Take advantage of deep sleep
Wait until your baby has been sleeping peacefully for a while and then gently lift a hand out from under the blanket. If the fingers are relaxed and curled only slightly, you know the sleep is deep enough to start. Work slowly, and if your baby stirs, pause for a few seconds before trying again.
- Create a comforting routine
Once your little one is more awake and alert to what you are doing, create a tiny tradition around nail care. You might:
-
- Always sing the same lullaby
- Offer a special rattle that only appears during trimming
- Play gentle music in the background Over time, your baby starts to link nail care with calm, familiar sounds instead of fear.
- Check in with yourself
If you feel hurried, angry, or very anxious, take a short break. A calm parent usually leads to a calm baby, and that alone makes how to cut a newborn's nails far easier.
Common Mistakes To Avoid
Being aware of common mistakes makes it easier to avoid them:
- Using the wrong tools
Adult clippers and sharp household scissors are not made for essential baby grooming checklist and can easily slip. Sticking to baby-safe tools, such as those in R for Rabbit manicure kits, keeps the size and sharpness appropriate for tiny fingers and toes.
- Trimming in poor light
Cutting nails on a dim sofa at night makes it hard to see where nail ends and skin begins. Always move near a bright window or switch on a focused lamp so you can see clearly.
- Rushing through the trim
Trying to finish all nails quickly when your baby is hungry, over-tired, or already crying raises the chance of slips and nicks. It is far better to stop and try again later than to fight through a stressful session.
- Pulling or biting hangnails
Avoid pulling or biting hangnails. Instead, trim them gently with baby scissors and then smooth with a file so there is no torn skin.
- Cutting too short
Many parents cut nails too short in the hope that they will not need to trim again so soon. This can make fingertips sore and increase the chance of ingrown nails, especially on the toes. Leaving a thin white line at the edge is safer, even if it means you return with the clippers a bit earlier.
- Skipping the smoothing step
Even if the cut looks neat, a fast pass with a baby file gives you extra protection against surprise scratches on your baby’s face.
What To Do If You Accidentally Nick Your Baby's Skin
Even with care and practice, a tiny cut can still happen while you are baby hygiene tips checklist. Almost every parent faces this at least once, so you are not alone. The sight of blood on such a small finger can be frightening, but fingertips bleed more than you expect because they have many small blood vessels.
If it happens, follow these steps:
- Stay as calm as you can
Your baby will react more to your voice and facial expression than to the quick sting of the cut. Hold your little one close, speak softly, and give a cuddle while you reach for a clean cloth or sterile gauze.
- Apply gentle pressure
Press the cloth gently but firmly on the cut. Hold the pressure steady for a few minutes without checking too soon, because lifting the cloth again and again can restart the bleeding. In most cases, the blood slows and stops within a short time.
- Clean the area
Once the bleeding has stopped, you can rinse the area with cool water and, if needed, a tiny bit of mild baby soap. Rinse again and pat dry with a clean towel.
There are also a few things you should avoid:
- Do not use a bandage on a baby’s finger because it can come loose and become a choking risk if it ends up in the mouth.
- Skip liquid bandages and strong antiseptic wipes, since the chemicals can be harsh on tender skin and may sting badly.
- Do not panic and rush to finish the rest of the nails-stop and try again another day.
Call your pediatrician if:
- The bleeding continues for longer than ten minutes despite steady pressure, or
- The area later becomes very red, swollen, or starts to ooze pus.
For minor nicks, healing is usually quick, often within a day or two. Try not to let one small accident stop you from learning how to cut a newborn's nails; each session makes your hands steadier.
- Essential Items for a Baby Grooming Kit: A Complete Guide for Indian Parents
- Baby Hygiene Tips and Checklist for New Parents!
- How to Use Baby Care Kit Set Like a Pro
- How to Build a Daily Hygiene Routine for Newborns?
- How to Choose the Best Grooming Kit for a Newborn
Conclusion
Learning how to cut a newborn's nails may feel scary at first, but it soon becomes a simple skill you use again and again. With the right timing, baby-safe tools, and a gentle step-by-step method, you can protect your baby from scratches, keep germs away from tiny fingers, and make nail care a calm part of your regular grooming routine.
Remember these three main pillars of safe nail care:
- Choose a relaxed moment with good light
When both you and your baby are calm, trimming is smoother and safer.
- Use tools made for infants
R for Rabbit grooming kits-such as the Stylo Apple, Stylo Teddy, Stylo Tweety, and Stylo All-in-One Baby Grooming Kits-are designed specifically for small, delicate nails and trusted by thousands of Indian parents.
- Follow the correct technique for fingers and toes
Trim slowly, keep a small white edge, cut toenails straight across, and always smooth every edge with a file.
If a small nick happens along the way, treat it, forgive yourself, and try again another day. With a little practice, cutting newborn nails will feel less like a scary task and more like a quiet bonding moment. Whenever you are ready to make baby nail trimming safer and easier, R for Rabbit is there with thoughtful grooming kits that support you through each tiny milestone.


